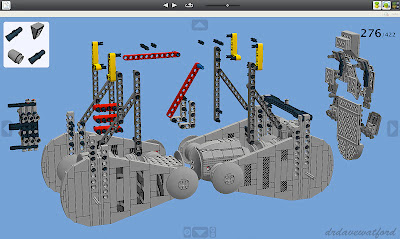
Suitably confident after having largely breezed through the first part of the build, I decided to face my demons head on and attempt the AT-AT body next. This was really the only part of the build that I'd been facing with a degree of trepidation, on account of the complexity of the structure plus designer Pete's warning that there might be mistakes in the LDD rendition of his design. Having at times struggled through the distinctly illogical LDD-generated building guide while constructing the legs, I was also wary of what the building guide would throw at me this time round given the significantly greater level of complexity that it needed to negotiate. As it turned out, I was right to be apprehensive....
Above you can see a screen grab of the LDD file for the AT-AT body (click to enlarge). It's 'only' made up of 1285 parts in total, so significantly less than the legs. Once again I had the added complication that the LDD file had been tidied up a bit by Pete after I'd sourced the parts, so some of the hidden internal pieces I'd collected were a different colour to those in the LDD file. Thankfully however this didn't turn out to be too much of a problem.
I got a hint of the challenge to come as I waited for LDD to generate the building guide for this section of the model; the operation took almost 10 minutes on my (reasonably high spec) iMac, yielding an impressive 422 building steps. First to be built were the structures to which the legs would later attach plus the large cylindrical structures slung under the body which I assume are the engines, then a bunch of greebles, and finally the floor of the body and the internal skeleton upon which everything else would ultimately hang. At time of writing I'm up to step 343 of 422, so a good way into the build, and you can see a few pictures of the build so far below (click to enlarge).
.jpg) |
| Attachment points for front legs & forward engine section. |
.jpg) |
| Attachment points for back legs & rear engine section |
.jpg) |
| Work in progress : Body - floor |
.jpg) |
| Work in progress : Body - underside |
LDD is a superb tool, but a build of this size and complexity has seriously shown up the limitations of the building guide generator. Even so, I'm getting there, slowly but surely, and next time I post an update I should have finished the body and decided on what to tackle next. Hopefully....
<-- Building the AT-AT : Part 3 Building the AT-AT : Part 5 -->
.jpg)
.jpg)
.jpg)
No comments:
Post a Comment